When it comes to woodworking, few things say “clean craftsmanship” like a perfect miter joint. If you’re building floating corner shelves, learning how to miter them correctly is the key to achieving professional-level results. Whether you’re a DIY enthusiast or a seasoned woodworker, this guide will walk you through the steps to miter corner shelves with confidence, precision, and style.

Why Use Mitered Corners for Corner Shelves?
Miter joints do more than just look good — they offer practical advantages:
- Clean, seamless edges that highlight the grain of your wood.
- Stronger structure when reinforced properly.
- More professional look, especially for floating shelves in high-visibility areas like kitchens, living rooms, or offices.
Whether you’re working with solid oak, walnut, or reclaimed pine, a good miter joint elevates your project.
Tools and Materials You’ll Need
Before we dive into the how-to, let’s gather your essentials:
🛠 Tools:
- Miter saw or table saw with miter gauge
- Clamps (corner clamps recommended)
- Measuring tape
- Square or angle finder
- Wood glue
- Sandpaper or sanding block
- Wood filler (optional)
- Finish (oil, wax, or polyurethane)
Materials:
- Hardwood boards (choose quality wood like oak, ash, or walnut)
- Wall brackets or floating shelf hardware (if not wall-anchored directly)
Step-by-Step: How to Miter Corner Shelves
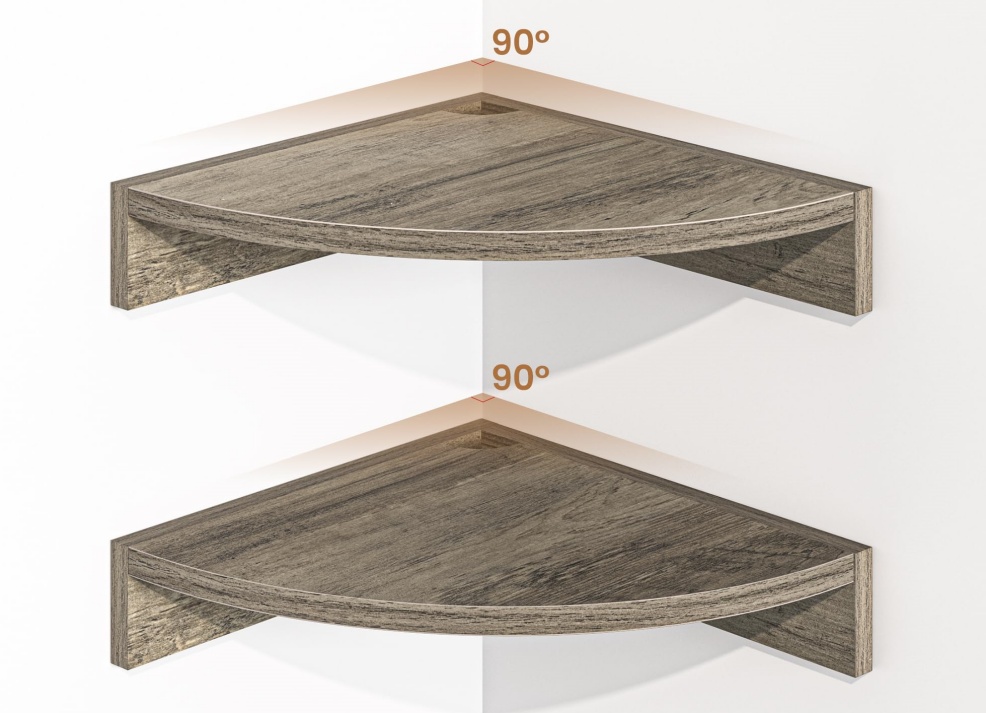
🔹 Step 1: Measure Your Corner Space
Start by measuring both walls of your corner. Remember — not all corners are exactly 90 degrees, especially in older homes. Use an angle finder to get the precise angle. A slight deviation can throw off your whole shelf if not accounted for.
Pro Tip: Cut test pieces first using scrap wood to double-check your angle before committing to final cuts.
🔹 Step 2: Set Your Saw to the Correct Miter Angle
For a standard 90° corner, each board will need a 45° cut on one end. If your wall corner is off-square (like 88° or 92°), adjust the miter angle accordingly. Divide the corner angle by two to find the angle for each shelf edge.
Example:
Corner angle = 92°
Miter angle = 92° ÷ 2 = 46° for each board
🔹 Step 3: Cut Your Boards to Size and Miter the Edges
Use a miter saw or table saw to cut your boards to the correct length. Then carefully miter the ends that will join together in the corner.
Double-check that the grain direction flows naturally between both pieces — this little detail makes a big difference visually.
🔹 Step 4: Test Fit and Adjust
Dry-fit your shelf boards together in the corner without glue to ensure the joint fits tightly. Use a square to check the angle and a straightedge to make sure the shelf is flush along the wall.
If there’s a gap, lightly sand the mitered edge or adjust the saw angle slightly.
🔹 Step 5: Glue and Clamp
Apply wood glue to both mitered edges and press the boards together. Use corner clamps to keep them aligned and square. Wipe off any excess glue with a damp cloth.
Let the glue set for at least 30 minutes before removing the clamps (follow your glue’s instructions for full cure time).
🔹 Step 6: Sand and Fill (if needed)
Once the glue is dry, sand the entire shelf smooth, especially along the joint line. If there’s a visible gap, fill it with matching wood filler or sawdust mixed with glue.
Sand again after it dries for a smooth, seamless finish.
🔹 Step 7: Mount and Finish
If you’re going for a floating shelf look, mount the hardware inside the wall first. Drill mounting holes into the back of your shelf if required, and slide it into place.
Apply your chosen finish — whether it’s a natural oil, matte polyurethane, or something else — to bring out the grain and protect your work.

Final Thoughts
Learning how to miter corner shelves is a game changer in woodworking. Not only does it add strength and beauty to your project, but it also teaches you patience and precision. At DTWood Decor, we believe that every handmade piece tells a story — and a well-cut miter joint is a line in that story worth celebrating.
So next time you look at an empty corner in your home, think of it not as wasted space — but as a canvas for craftsmanship.
Want a custom-made mitered corner shelf handcrafted by professionals? Browse our Corner Shelves or get in touch for bespoke designs tailored to your space.