Looking for a creative way to blend functionality with natural beauty? This Tree Bookshelf DIY guide is exactly what you need. Instead of a traditional, boring bookshelf, why not craft a stunning tree-shaped shelf that brings the outdoors in? With its organic curves and branch-like shelves, this unique piece transforms any room into a cozy, artistic haven.
Whether you’re a seasoned woodworker or a weekend DIYer, this step-by-step guide will walk you through creating your very own tree bookshelf—perfect for displaying books, plants, and your personal touch of nature-inspired design.

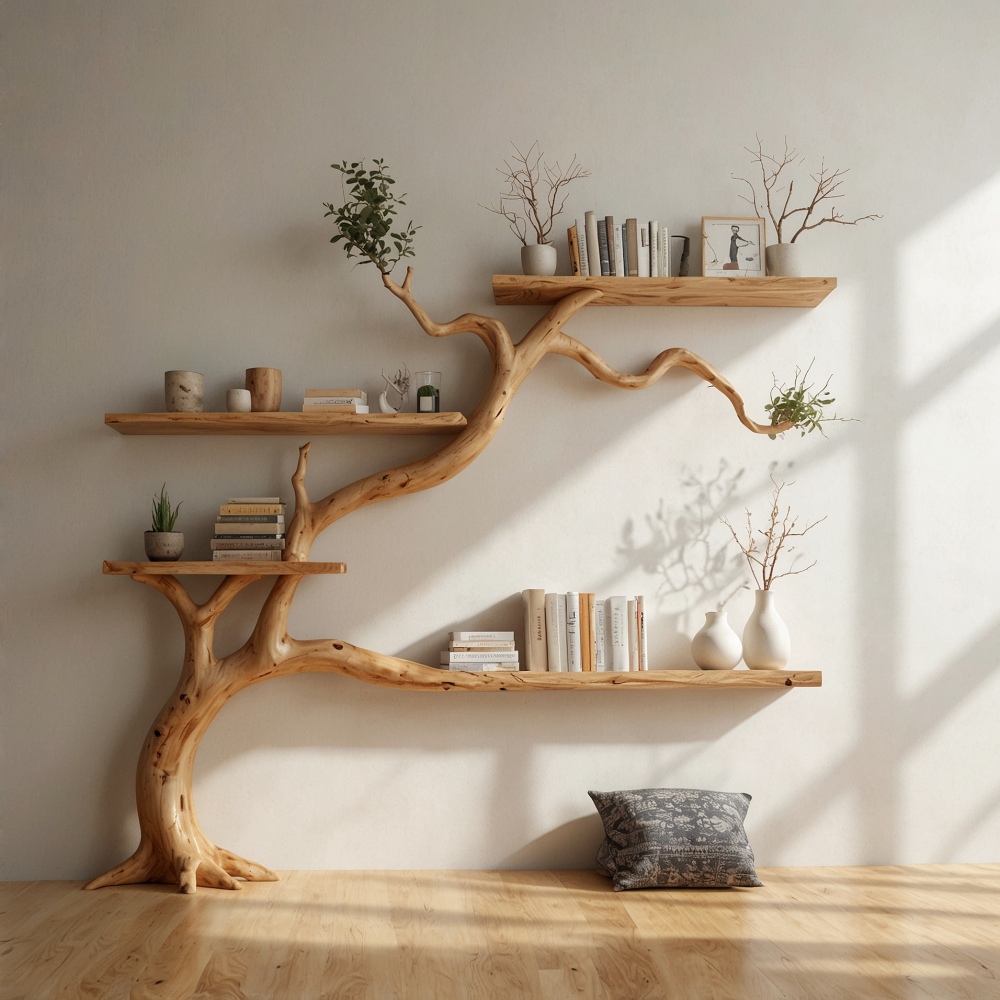
Bring the beauty of nature into your home with this stunning tree-shaped bookshelf.
Imagine combining functionality, creativity, and natural aesthetics into one beautiful piece of furniture. The tree bookshelf does exactly that—it’s more than a bookshelf; it’s a statement. Whether you’re a book lover, a fan of woodworking, or just want to add a whimsical, nature-inspired touch to your space, this DIY guide is for you.
In this tutorial, we’ll walk you through creating your own tree-shaped bookshelf—just like the one in the image—with step-by-step instructions, tips, and inspiration.
🧰 Tools & Materials You’ll Need:
Tools:
Jigsaw or bandsaw
Electric drill
Wood screws
Sandpaper or electric sander
Wood glue
Clamps
Level
Measuring tape
Stud finder
Paintbrush or cloth (for finish)
Materials:
Solid wood slabs or planks (choose durable wood like oak, ash, or maple)
Wall anchors (if needed)
Wood stain or clear finish (optional)
Brackets (hidden or decorative, for extra support)
Wall mounting hardware
🌿 Tree Bookshelf DIY – Step-by-Step Instructions
Step 1: Design Your Tree

Start by sketching the shape of the tree bookshelf. The beauty lies in its organic, flowing lines, so embrace curves and branches. You can replicate the look in the image—trunk base flowing into shelves branching out—or personalize it.
👉 Tip: Use tracing paper to experiment with different shapes.
Step 2: Select & Cut the Wood
Choose sturdy wood for both the trunk and branches. Cut the tree trunk and “branches” (which double as shelves) using a jigsaw or bandsaw. If you want the natural edge look, choose live edge planks or carve irregular shapes to mimic branches.
Trunk: about 4–6 inches wide for stability.
Shelves: flat and level, but organically shaped to look like branches.
Step 3: Sand & Smooth
Use sandpaper or an electric sander to smooth all surfaces and edges. This not only makes the piece safer but gives it a polished, professional look.

👉 Don’t forget to round off the edges to enhance the tree-like flow.
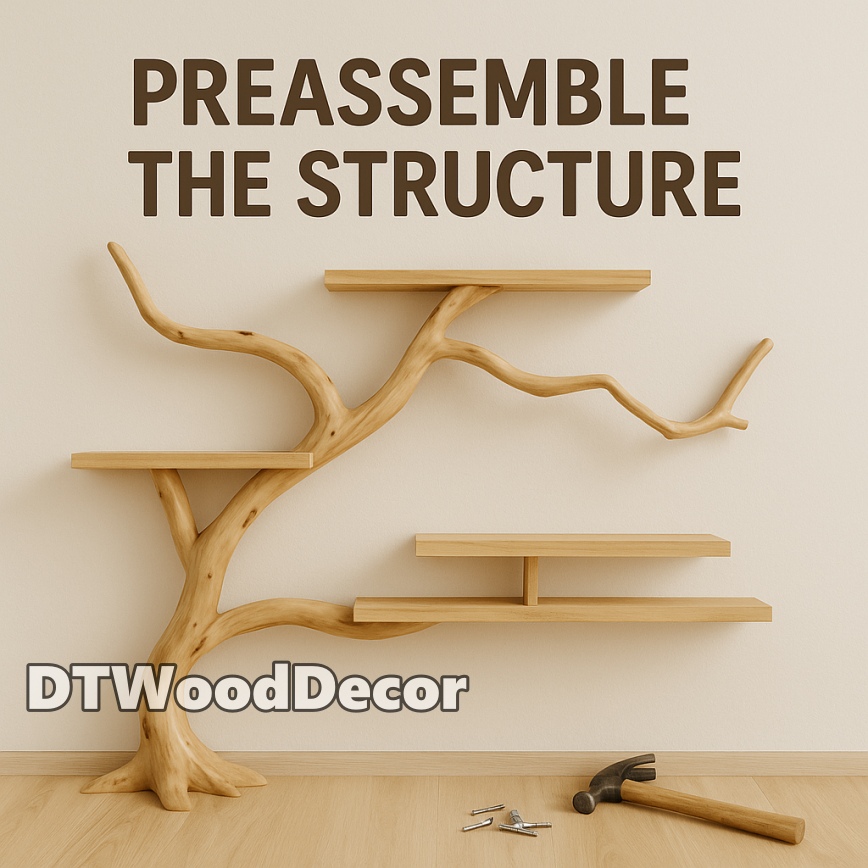
Step 4: Preassemble the Structure
Lay out all the parts on the floor to visualize how the tree will look. Use wood glue and clamps to join branch pieces to the trunk where necessary. Let it dry overnight. This is your chance to tweak the layout.
Step 5: Wall Mounting Preparation
Locate wall studs using a stud finder.
Mark the positions for trunk mounting.
Pre-drill holes both in the wood and the wall for easier installation.
If your structure is heavy, use additional brackets or hidden supports for each shelf.

Step 6: Finish the Wood
Apply a wood stain or clear coat to protect the wood and enhance its grain. Use a cloth for a natural finish or a brush for deeper tones. Let it dry completely before installation.
Step 7: Installation Time
Carefully lift and mount the tree structure to the wall, starting with the base. Secure it with screws into wall studs or wall anchors. Use a level to make sure each shelf is straight. Add extra screws or L-brackets under larger shelves if needed.
🌱 Step 8: Decorate!
Now the fun part—add books, vases, plants, candles, or any items that reflect your style. Mix textures and colors for visual interest. The shelf itself is a sculpture, so keep it light and airy.
💡 Extra Tips:
Want a more rustic feel? Leave parts of the bark on the wood.
Short on tools? Many lumberyards or maker spaces offer cutting services.
If you’re renting, build the structure free-standing and anchor it with minimal wall damage.
🧡 Why You’ll Love It
Unique aesthetic: It’s not just a shelf—it’s functional art.
Conversation starter: Guests will ask, “Where did you get that?”
Customizable: Scale it to fit your wall and personal taste.
Sustainable: Use reclaimed or local wood for an eco-friendly project.
📸 Share Your Creation!
We’d love to see your take on the tree bookshelf! Tag your project with #TreeShelfDIY #DTWoodDecor on social media and show us how you brought the forest indoors.
Final Thoughts: Bring Nature and Craftsmanship Together
Creating your own tree bookshelf DIY is more than just building a piece of furniture—it’s about shaping a functional piece of art that brings a warm, organic feel into your living space. Whether you’re a seasoned woodworker or a curious beginner, this project offers a rewarding experience that combines creativity, craftsmanship, and a deep connection to natural forms.
By following each step—from designing your unique tree shape to preassembling and mounting it with care—you’ve turned a vision into a beautiful reality. Not only does this tree bookshelf serve as a stunning focal point, but it also tells a story: one of patience, imagination, and the joy of making something truly your own.
Now step back, admire your work, and maybe even start planning your next DIY adventure. Because once you’ve mastered the Tree Bookshelf DIY, the possibilities are as endless as the branches of your creativity.
